 |
hardware.atari.org |
|
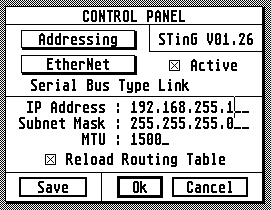
NETUS-Bee Sting Installation A step by step guide for installing a small Sting setup under TOS to allow an Atari with ethernet support to hook up to network. This package has been designed for low specification machines. It should work on a 1MB ST. Step One Install hardware and make sure the computer boots as usual. Step Two Download these files and unpack to the root of your hard disk on your Atari. It might be possible to work off a floppy disk but you'll need to go through some of the files to set the right paths. The files once unpacked will fit onto a 720K floppy disk. Step Three Get the latest driver for the EtherNEC/NETUS-Bee. Refer to the table here and the download section. Place STX driver with the other STX files in C:\STING\. Reset the Atari and let it boot back up. Step Four You need to set a PC to have an IP address of 192.168.255.2 Step Five Get the Control Panel on the Atari up, under the Desk drop down menu. Open Sting Port Setup and select EtherNet instead of Modem 1. Fill the details in just like the image below.
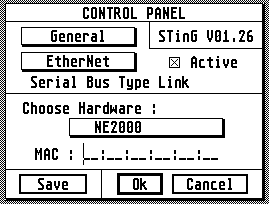
Step Six Now select General instead of Address and fill in again as below.
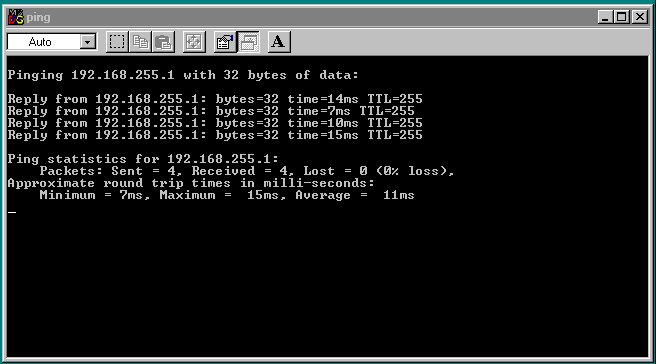
Step Seven Click Save to save the options to the root of the hard drive and then OK. Exit the Control Panal and go back into Sting Port Setup to check that the MAC address has appeared. Now reset and let it boot up once more. Step Eight Check you have a link by pinging. On the Windows PC click on the Start bar, and click on the RUN option. Type in ping 192.168.255.1, you should see something similar as below. Observe the lights on the network card and EtherNEC/NETUS-Bee to check they're flashing correctly. You can keep it pinging by typing ping 192.168.255.1 -t
|


